
Generate a color palette with a prompt using the Chat Completions API & gpt-3.5-turbo model from OpenAI, a Flask server and a simple web page

Hello readers! If you have been keeping up with my blogs and posts on LinkedIn, you probably know that I have been fully immersed in AI. I am absolutely loving it and each week I go further into the depths of my knowledge. I built a pretty cool project this weekend that I would like to share.
Overall Project Statement
Build a web application that integrates with OpenAI’s Chat Completion API and uses the gpt-3.5-turbo model and train it to accept a prompt and output an array of hexadecimal codes that serves as a color palette representing that statement.
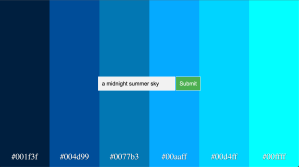
For example, if the user provides the prompt: A midnight summer sky
The model would return: [“#001f3f”, “#004d99”, “#0077b3”, “#00aaff”, “#00d4ff”, “#00ffff”]
We would then take these hexadecimal values and show them on a web page for the user to view and copy if needed.
Let’s break down everything we need to build this for the user.
Import our libraries
import openai
from flask import Flask, render_template, request
from dotenv import dotenv_values
import json
openai: supported library from OpenAI for leveraging their APIs and models
Application usage: establishing our api key, utilizing the Chat Completion API and the gtp-3.5-turbo model
Flask, render_template, request from flask: Flask is a web application framework written in Python.
Application usage: we will use Flask to quickly spin up a server and build a web page to interact with the routes that we expose
dotenv_values from dotenv: a zero-dependency module that loads environment variables from a
.envfileApplication usage: we will use a .env file stored locally to reference the API key that is provided by OpenAI
json: JSON manipulation
Application usage: we will use json manipulation to ensure the response is a compatible JSON object across python and JS
Reference and set OpenAI API Key
config = dotenv_values("../.env")

openai.api_key = config["OPENAI_API_KEY"]
What you don’t see here is that I created a .env file in my local directory to use as a config file to store my OpenAI API key. You don’t have to do this but its always a good idea and good practice to separate out your key references as much as possible so that you don’t accidentally expose them. This is especially important for services like OpenAI which is pay per use and if someone got a hold of it, it could be bad news if you don’t set a limit on their usage configuration.
Btw, as a side note for those who are budget conscious but are also interested in exploring this technology, it took me about 72 cents to build out this entire project, including debugging. I know that pay per use APIs are sometimes a little bit scary to use but OpenAI allows you to establish a threshold to your spending. My current threshold is $12 / mo and I never come close to that limit.
Another good thing about OpenAI is this email I got the other day when I accidentally promoted my key to Github and did the exact thing I am telling you not to do:

Construct our messages array and call the Chat Completion API
def get_colors(msg):
    messages = [
        {
            "role": "system",
            "content": "You are a color palette generating assistant that responds to text promps and returns color paletters."
        },
        {
            "role": "system",
            "content": "Your resposne should only be one JSON array containing hexadecimals and contain 0 text. The array should have a length between 2 and 8 values. Do not add any text before or after you provide the array"
        },
        {
            "role": "assistant",
            "content": "Of course, I'd be happy to help you generate color palettes! "
        },
        {
            "role": "user",
            "content": msg
        }
    ]

    response = openai.ChatCompletion.create(
        messages=messages,
        model="gpt-3.5-turbo",
    )
    colors = response["choices"][0]["message"]["content"]
    colors_json = json.loads(colors);
    return colors_json;
The Chat Completions API requires at least the api_key assignment mentioned above, an array of messages, and the model you wish to use (in this case its gpt-3.5-turbo). OpenAI has great documentation on all of their models that you can refer to and many different APIs as well.
Let’s dig into messages a little bit. A system message is used to prime the assistant with different personalities and behaviors. The user message is used to instruct the model on what to do. The assistant message is used to instruct the model on how to respond.
In the example above, we are using the system message to not only instruct the model on who they are in this context but also how they should respond when receiving a prompt. I have noticed that you have to tweak with the model a bit to get it to respond the way you want. In my example, I only wanted a single array to be returned after the prompt was processed, however sometimes it comes with pre or post text that you might not want.
The last thing to do is add a msg parameter to the python method to dynamically pass it into the prompt each time a user submits from the web page.
Once we have configured the messages correctly, we pass it into the openai.ChatCompletion.create() method to get our response.
Flask Server
Now that we are getting the data we want from OpenAI, we can set up a very simple Flask server and expose some routes so that we can call our own endpoints.
app = Flask(__name__,
            template_folder='templates',
            static_url_path='',
            static_folder='static'
            )

@app.route("/palette", methods=["POST"])
def prompt_to_palette():
    query = request.form.get("query")
    print('what is query? ', query)
    colors = get_colors(query)
    colors_json = {
        'colors': colors
    }
    return colors_json;

@app.route("/")
def index():
    return render_template("index.html")

if __name__ == "__main__":
    app.run(debug=True)
The first route handles the /palette endpoint with a POST method. To run your Flask server, you can simply run the command flask run –debug. The –debug is especially nice because it allows your server to rerun on any changes that you make. A nice way to test this once you have it setup is to call your endpoint from postman and pass in a value in the body. You can then use the request import from the flask library import to get the value of the query or whatever value you choose to call it. Query, in our case, represents the msg that we send into our get_colors method that we covered above.
The second route handles the default route when accessing the site, in this case its a local host. This uses the render import from the flask library to call the index.html page that hosts the page.
Simple Web Page
Lastly, here is a sample of the Javascript that we use in app.js to callout endpoint and render the palettes onto the html page.
const query = form.elements.query.value;
    fetch("/palette", {
        method: "POST",
        headers: {
            "Content-type": "application/x-www-form-urlencoded"
        },
        body: new URLSearchParams({
            query: query
        })
    })
    .then((response) => response.json())
    .then((data) => {
        const colors = data.colors;
        console.log('what is the value of returned colors? ', colors)
        const container = document.querySelector(".container");
        createColorBlocks(colors, container);
    })
I really enjoyed this little project. Its worth calling out that this project is from a class I am currently taking on Udemy called Mastering OpenAI. Also check out my github for the full view into the code.
Let me know if you have any questions or suggestions on my posts. Happy Coding!